First start-up
Before using the receiver for the first time, charge it with the supplied 5V/2A power adapter and the USB-A to USB-C cable, plugging the USB-C connector into the port marked (7) in figure 2 (fast charging). The red LED (5) will light up and stay on for the whole charging cycle. Once charging is complete it switches off automatically, preserving the condition of the battery.
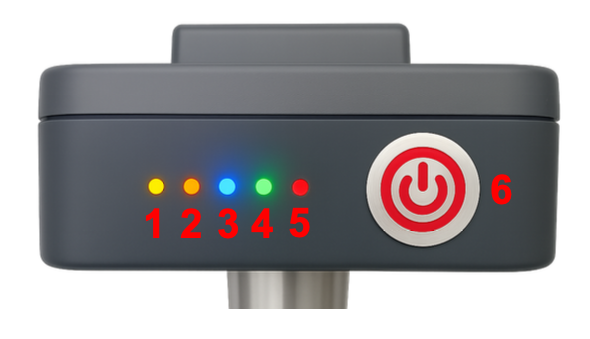
Fig.1 MS2 front view
Press and hold the power button (6) for a few seconds until the receiver turns on: the device is powered up and the red backlit button LED (6) lights up on the front.
Note
On a few units the button backlight may be white or green instead, although this is very rare.
Here is an overview of the LEDs and their colours:
- steady red LED Charging status (5) until the battery is full
- steady orange LED GNSS (1) – (geofence)
- steady yellow LED GNSS (2) – until the satellites are tracked
- flashing yellow LED GNSS (2) (satellite tracking achieved)
- steady blue LED Bluetooth (3) – Bluetooth on and connected
- flashing green LED GNSS (4) (correction received, DGPS or FLOAT status)
- steady green LED GNSS (4) (correction received, FIX status)
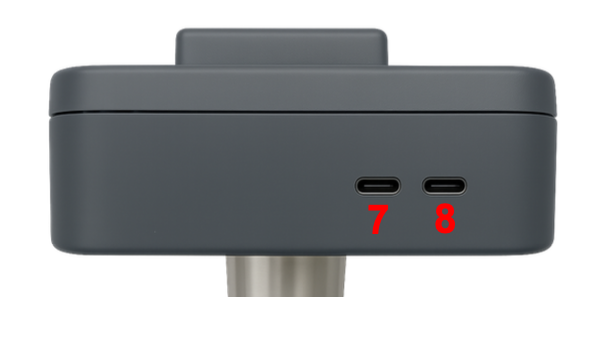
Fig.2 MS2 rear view
Note
- If the GNSS LED (4) stays off, the receiver is in DGPS status: the satellites are tracked but no network correction is being applied
- To configure or update the device use the supplied USB/USB-C cable (8); see the chapters Firmware update and Uploading configurations
- To switch the GNSS system off, press and hold the power button (6) for a few seconds until it shuts down completely
- For differential processing through NTRIP client software, see the chapter NTRIP Client
Warning
Inside the receiver there is a microcontroller programmed to monitor the charge of the internal battery: it warns the user with an audible alarm (a buzzer with an alternating tone) and by flashing the power button backlight in red (at roughly 10% of battery). A simple power bank is enough to recharge the unit on the go.
To recharge the internal battery, plug the USB/USB-C cable into the inner port marked (7). The receiver can also be charged through the outer port (8), but charging will be slower: that port is meant for communication between the computer and the receiver and is less suited to charging.
Please note that:
- The internal battery has a capacity of 4000 mAh
- Under standard environmental conditions the system draws about 350 mAh in RTK
- The receiver therefore runs for about 11.43 hours under standard environmental conditions
- The inner port of the receiver (7) delivers roughly 720 mAh
- The outer port of the receiver (8) delivers roughly 350 mAh
To start the receiver in NRTK mode you need login credentials for the reference GNSS network and a data connection through a piece of software normally called an NTRIP client. A dedicated section covers this topic.
Here is a short video summarising the whole procedure.